
Out of Tetra Pak bricks Want to do a very original and cheap craft? We will teach you how to make shoes from Lele bricks. Do you want to learn how to do it? It is very easy to make such crafts, you just have to follow all our steps. We hope you enjoy it, and when you make it, send us a photo of your shoes so we can see it.
You will need:
- A large chunk of four pieces of milk or juice
- Scissors or knives
- Scotch tape
- Tissue paper of different colors
- Mix the white gum with water
- Diary paper
- White cardboard
Steps to follow:
1: To start making this process, you need 1 liter of four pieces of milk or juice.
2: Cut the Tetra Pak in half lengthwise with the help of scissors or a knife. Then, make four cuts as we show in the photo. In this way, you will divide the LEGO bricks into three parts: one for the tip (shortest), another for the instep (maximum) and the last for the heel (medium).
3: Tape the three parts together to form the shape of the shoe. If you use paper tape, it will be easier to handle, you can cut it with your fingers. It is important that the shape of the shoes is fixed, so use a lot of adhesive tape. It is very important that the toes and heels of the shoe are perfectly parallel to each other and perfectly parallel to the table, so that it can stand up perfectly. Choose the angle of the shoe according to the heel you want (I want to make high heels).
4: Now is the time to make the heel. To do this, she picks up a piece of cardboard and rolls it into a cone. If you want the heel to be a little thicker, don’t get too tight. Secure it with a piece of tape so that the cone does not move.
5: Use scissors to cut four cuts at the top of the heel (pictured). After cutting, open 4 flaps for gluing the heel to the shoe.
6: Place the heel on the tongue. Use enough tape to secure it and make sure the shoes stand perfectly on the table.
7: Use more tape around the heel so it’s safe.
8: You’ve finished the last. Now grab a sheet and put your shoes on it. Mark its outline with a pencil.
9: We have marked the outline of the shoes. Now all you have to do is decorate it to your liking and draw everything you want to add.
10: In this case, I want to make a round toe shoe. For this, I took a newspaper and made a ball.
11: This tissue paper will be used to stick the newspaper ball to the toe cap. Place the ball on the tip, moisten the paper with glue and water on it and stick it well to the shoes. After this, you will take brown tissue paper and start lining the entire shoe (inside and out, including the heel).
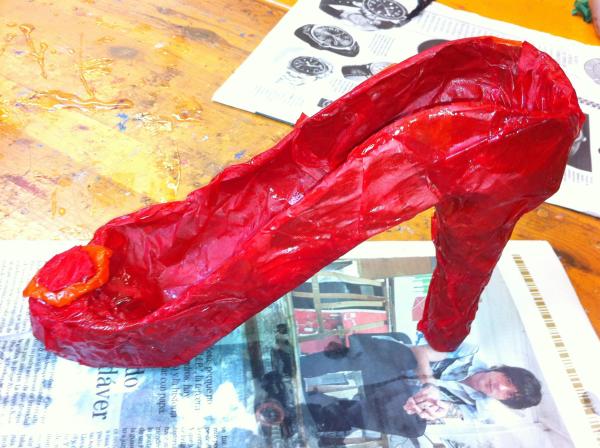
12: We have lined the whole shoe perfectly with tissue paper and glue. Now all you have to do is color it!
13: I chose red to be able to color it, you just need more tissue paper of the color of your choice, and then you will start lining it, as you do on kraft paper. Remember to moisten each piece of paper well with a mixture of glue and water to keep it in place. Do you like the results?
14: In order to give a little color to the toe and make a little decoration for the shoes, you can add some decoration. Here you can see that we made a detail on the toe cap with orange and red tissue paper. It’s done! Now all you have to do is leave it for a few days so that it dries completely. You’ve made a beautiful shoe that will decorate any of your furniture and/or shelves!


